La Der des Ders – The War to End War, made by Hexasim, is a board game for one or two players. It gives a somewhat simplified, strategic look at World War I. The game lets players experience the First World War from a high-level view. Each player takes charge of one side: either the Entente, which included France, England, Russia, Serbia, and smaller countries, or the Central Powers, made up of Germany, Austria-Hungary, the Ottoman Empire, and a few others.
You can also play La Der des Ders by yourself. A special solo helper, called “Athena,” uses special Cornflower Cards to decide where to put money into new technology, where to attack, and how to best use limited supplies and new troops. Every turn, players get a certain number of Re
In this series of articles, we’ll first look at the Game Board. We’ll talk about the Collapse Tracks, Trade Tracks, the Russian Revolution Track, and the Naval Control Table. We’ll also cover other charts on the board and spaces for attacks. Then, we’ll examine the Technology Phase, the Technology Tree, and the Technology Improvement Boards. We’ll also check out the Event Cards and how they change the game. We’ll walk through an example of an attack and how combat works, go over the ways to win, and give an overview of the “Athena” solo bot and how it functions.
Game Board
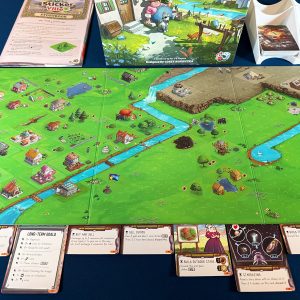
The game board for La Der des Ders shows the whole of Europe and the eastern parts of World War I. It’s a simplified map of the main countries involved. You won’t see detailed borders for every country, and not all of a country is shown, like the vastness of the Ottoman Empire or the huge Russian lands. There’s also a small map in the bottom left corner showing the war in Africa. The board is split into areas called Sectors, representing the major and minor powers in the war. These Sectors stand for the main countries, and one Sector might even stand for a few countries together. For instance, England doesn’t have its own playable area or a Collapse Track on the board, just a picture of its islands. The troops from Britain and Belgium are combined with France’s for simplicity and to fit the game’s design.
To make these Sectors easier to tell apart and to make playing simpler, they are colored blue for the Entente side and green for the Central Powers.
The Collapse Tracks
Let’s look closer at the information on these Sectors. The picture above shows Germany, with France (bottom left), Austria-Hungary (right), and Russia (top right) also visible. You’ll see a line of small boxes with numbers going from 3 down to 0, and then a blank box on the far right. These numbers show the “Operational Value.” This line is called the Collapse Track. It represents how well a country is doing in the war, including its spirit, economy, supplies, and readiness.
On the left side of the Collapse Track is the country’s Production Value, shown in a yellow circle. This number tells you how many Re
At the start of the game, a small wooden cube is placed next to the box with the red number. When a Sector loses troops or supplies due to attacks or Event Cards, the cube moves to the right on the Collapse Track. If a Sector gets more troops or supplies, the cube moves back to the left. The cube never goes on the space with the red number. You need to look at the number in the box to the left of the cube to know the current Operational Value. This number shows the most Re
On the far right of the Collapse Track is the Attack Value. This is used when attacking. It tells you if your troops and cannons score hits. The Attack Value is shown as a number on a die face. If your attack dice roll is equal to or higher than this number, you score a hit, and the defender loses troops, moving their cube down the Collapse Track. You can improve this Attack Value by researching technologies, which can help with attacking and defending. You add up any bonuses from these technologies or Event Cards to change the target Attack Value.
Offensive Arrows
Arrows on the board show where you can attack. They also show which areas have already attacked an adjacent area this turn. Red arrows connect nearby Sectors. When an attack happens, a marker covers the arrow. The picture below shows Serbia as an example. Serbia is next to Central Powers countries like Austria-Hungary and Bulgaria (which starts neutral). It also borders allied nations like Romania and Greece (both start neutral). Each of these bordering Sectors has two Offensive Arrows pointing to or from Serbia, meaning Serbia can be attacked and can attack them.
Remember, a Sector can only start one attack each turn, and it must be against a nearby enemy Sector. A Sector can be attacked by several enemies in the same turn, but each attack is handled one by one.
Trade Tracks
There are two Trade Tracks on the game board, both in the top left corner. One is for the Entente (Merchant Navy) and the other for the Central Powers (Kaiserliche Marine). These tracks give both sides extra Re
Russian Revolution Track
The Russian Revolution Track shows how close Russia is to having its revolution, which historically happened in March 1917. The Russian Revolution Marker starts in the white space. This marker can move right each time Russia gets more troops. It never moves left. When the marker reaches the last space, the revolution happens, and Russia stops producing resources and can’t get more troops.
Naval Control Table and Track
The Naval Control Table shows how German U-boats attacked ships and how the Entente received help from the United States. At the start of each turn, a die is rolled, and the table shows how many Re
The track below the Naval Control Table shows a number that affects the Central Powers’ Naval Control die rolls. It considers the naval technology levels of both sides. At the start, only the Central Powers can roll the Naval Control die. You might see a small gray box with a lock next to the Naval Control Table, meaning the Entente can’t roll yet. They can only do so once they reach Naval Technology Level 1.
There are also several other tracks on the board. The Re
One last thing about the game board. Marc von Martial did a great job as the artist. The board is very useful and helps make playing easier, but it’s also very nice to look at and has a clean, pleasant look. I like the colors used. Even though my older eyes sometimes have trouble telling light gray and green apart, the colors work well together. The tracks and information on the board are clear and easy to read. I really like how the game board looks and want to congratulate him on his excellent graphic design work.
In the next part of this series, we’ll cover what I think is one of the best parts of the game: the Technology Phase, the Technology Tree, and the Technological Improvement Boards.
-Grant