Played with a review copy provided by the publisher
In Natera: New Beginning, you take on the role of a smart animal group trying to take over areas left behind after people are gone. Your goal is to explore, build up your influence, and control four different parts of the world. You’ll have a special leader for your tribe and some explorers to help you. By taking over areas, you’ll unlock better building pieces and can set up your own settlements to make your mark. You can also use old human knowledge to get special boosts on a tech tree. The game lasts for four seasons, and whoever has the most points at the end shows they’re the best at surviving in this new natural world. The game comes with over 150 cards for exploring, finding new things, and making improvements. There are also forty unique specialist cards, so each game can be played in a different way, with different strategies for your animal tribe.
To get started, you put the game board on the table. Then, you place the hidden location pieces for the second and third levels in their spots. The two piles of exploration cards are mixed up and put near the board. The blue Specialist cards are also mixed, and then five of them are laid out like a market. Five special markers are placed under the time track.
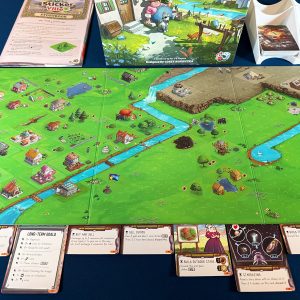
The game board has five main areas: one in each corner and a central forest area. The four corner areas each have a track to show how much influence a player has. Each player puts one of their markers at the beginning of these tracks. Inside each area, there are different places to explore. At the start, only the first level of places is visible. Each area on the board has a different theme:
Farm (yellow area) – Good for collecting food and other supplies.
City (blue area) – Best for finding useful items or getting new exploration cards.
Forest (tan area) – You can find all kinds of supplies here, but you have to trade cards for them.
Military (pink area) – Use this to gain power and control influence in the area.
Coast (green area) – Good for trading food for other types of supplies.
Each player gets their own board and all the game pieces in their color. There’s a spot on the player board to keep your supplies. Players get two tribe cards, and they choose one to keep. You also get starting supplies based on your tribe’s small picture tile. Each player also gets a science board at random, and they can choose which side to use. This board is like a tech tree. Players also place markers for growth bonuses, getting rewards as they move along the bonus track.
Finally, everyone gets a starting hand of six basic (green) exploration cards and two advanced (orange) exploration cards. Each player then picks five of these cards to keep.
The game is played over a year, with each of the four seasons being one round. During the action part of the season, players take turns doing one action at a time. In the rest part, the animal tribes get their supplies and draw new cards.
During the action part, players can either do an action or choose to pass for that round. The available actions are:
Send a Tribe Leader or Explorer – You send one of your workers to a place you can get to. You need at least 3 influence points to reach places in Tier 2, and 6 influence points for Tier 3. Tribe Leaders block a spot so no one else can go there later. When you visit a place, you do its action and also increase your influence in that area by 1. If you have 2 or more influence points in an area, you get a special marker for that area. This marker moves around like in the game “Settlers of Catan.” If there’s a settlement at the place you visit, the owner of the settlement gets a bonus shown on the board.
Play an Exploration Card – You pay the cost shown in the top left corner of the card, and you must also meet any requirements shown in red. The action on the bottom of the card then becomes available. This could be a one-time reward, an ongoing action, a special trade, or a way to get more supplies. The green Basic cards are easier to play because they cost less. The orange Advanced cards also give you victory points when you play them. Cards might have symbols on them in the bottom left. Other cards might need these symbols as requirements.
Hire a Specialist – You can play a card from the market by paying the food cost shown. You take the card, which is worth victory points. You also gain a new action that lets you trade power cells for other supplies. Then, you refill the market with a new card.
Use an Ability – Abilities are marked with a large black arrow. You pay what’s on the left to get what’s on the right. You can find these on your player board or on cards you’ve played. For example, you can trade 10 supply items for a settlement. You can place this settlement on any empty spot. This lets you collect a bonus whenever anyone visits that spot, and the settlement itself is worth 3 victory points at the end of the game. Card abilities can be used many times during the game, but only once per turn.
Discard Cards (free action) – You can get rid of 2 cards from your hand to gain 1 supply item of your choice. You can do this as many times as you want each turn. You still have to do another action after this.
Pass – You can choose to pass your turn for the action phase and wait until the rest phase.
Before you finish your turn, check if you can place a claim marker. You need to have 10 influence points in each of the four corner areas to claim them. There are also 5 special claim tokens chosen randomly each game. If you meet the requirements for any of these, you must place a marker there. Each claim marker you place is worth 7 victory points at the end of the game. Each bonus can only be claimed once per game, and once you place a claim, it stays there. Even if you no longer meet the requirements later, you keep the claim. Each player has 3 claim tokens, so you can place a maximum of 3 claims. If someone else claims a bonus first, you can still make a secondary claim at the end of the game for 3 victory points.
In the rest phase, which begins when all players have passed their turns, players get their Tribe Leader and Explorer tokens back. Then, players get supplies from various sources: their Tribe tile, their Science board, improvement cards they’ve played, the area influence markers, and their Tribe card. Finally, players draw improvement cards based on what the round tracker shows.
The game ends after the fourth season is completed. Points are then counted:
7 victory points for each claim token placed during the game.
3 victory points for each claim token that matches a claim another player already took.
3 victory points for each settlement.
Victory points for spaces claimed on the Science Board.
Victory points from Specialist Cards.
Victory points from Exploration cards.
7, 3, or 1 victory point for being 1st, 2nd, or 3rd on each Authority track.
The player with the most points wins. If there’s a tie, the player with the highest total influence across all four areas wins.
My thoughts on the game
I was really looking forward to checking out Natera at a game show in 2025 after reading about it. Since Natera is the first game from Horizon Games, I was a little unsure what to expect. It took a few months to finally play it, and I’m really sad it took that long. To sum it up quickly – Natera is a great game, both in how it plays and how it looks.
When I first read the rules, it didn’t seem like there was a lot to the game. You only have three workers to use each round, and there are only four rounds, so that’s just 12 worker placements in total. I thought the game would be over too fast, right? But there’s so much more going on. The cards offer a lot of variety, and many of them give you extra actions. You get some basic supplies at the start of each turn, and then you can use these supplies to do actions and even more actions as the round goes on.
Maybe you’ll use power cells to use a special ability. Maybe you’ll play a card that gives you a science token. You then put that token on your tech tree to get five knowledge tokens, which is enough to pay for another card! There are many cards that let you move one of your workers to a different spot and do that spot’s action (and get more influence). This keeps you thinking about where to place your workers.
The influence tracks are also an interesting part of the game. Each of the four corner areas has a different theme. Once you get at least 3 influence points, you can unlock the Tier 2 actions in that area. You can also see the very powerful Tier 3 action when you reach 6 influence points. Since there are several action tiles in each area, the game keeps you on your toes. You don’t know what your options will be until someone unlocks them and flips those tiles over. Besides getting access to better actions, the 7 victory points for leading an authority track are…